
Use these crafts when teaching kids about Doubting Thomas. They work with any John 20:19-31 lesson plan for Sunday School. Download the craft directions, watch our how-to instructions video, and then gather your craft supplies.

Craft Ideas about Doubting Thomas
Craft Ideas for Thomas and the Resurrection
The story of Thomas is an important one to emphasize how as Christians, we put our trust in Jesus despite the fact we cannot see Him physically. It’s a significant Scripture passage, but can seem challenging when translating into crafts. Here are a couple of simple items that are geared toward remembering Christ’s sacrifice, as well as the importance of faith and prayer.
Bible Verses or Craft Captions to Consider…
Jesus said to him, “Have you believed because you have seen me? Blessed are those who have not seen and yet have believed.” -John 20:31
We look not to the things that are seen but to the things that are unseen. For the things that are seen are transient, but the things that are unseen are eternal. -2 Corinthians 4:18
Now faith is the assurance of things hoped for, the conviction of things not seen. -Hebrews 11:1
I may not see…but I still believe!
Faith is blessed assurance that brings HOPE!
I may not see Jesus, but His presence gives me life!
More Teaching Ideas for Doubting Thomas
- Children’s Message on Doubting Thomas
- Jesus Lives (John 20:19-31) Sunday School Lesson
- Doubting Thomas Coloring Page
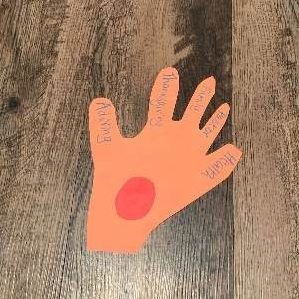
Craft one: “Handy Prayer”
You will need:
- Scissors
- Construction paper (any color)
- Markers or decorating materials
- Glue or tape
- Popsicle sticks (optional)
Procedure:
- Trace a hand onto paper or cardstock.
- Add a round “nail scar” in the center, if desired.
- Cut the hand out of the paper.
- On each finger, write a person or topic to pray for.
- If desired, place the praying hand on a stick or string for display.
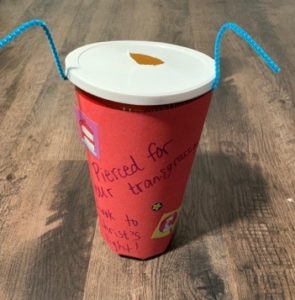
Craft Two: “Pierced Kaleidoscope”
You will need:


- Construction Paper or tissue paper
- Glue, tape, or staples
- Empty container (tissue box, oats container, etc.)
- Scissors
- Small scraps of paper or beads (optional)
- Markers, crayons, or decorative supplies
- Stickers or pipe cleaners (optional)
Procedure:
- On one side of the container, poke holes into a design, using scissors or a sharp pencil. On the other side, cut a hole in the lid to create an eye hole.
Decorate your container by covering it with paper, inside and out if desired.
- Add verse captions, notes, pictures, and stickers, as desired.
- If desired, add extra flair with papers, beads, or glitter. If using this strategy, cover the eye hole with some plastic.
- Hold your tool up to the light, peek through the hole, and admire your design!