Ten years ago, I had the opportunity to visit a Los Angeles ministry called the Dream Center. Associated with the Assemblies of God, the Dream Center had an amazing grasp on outreach, a skill they used to fill an old, abandoned hospital in downtown LA with new worshipers. So when I had the chance to join them for a week of evangelism training I jumped on it. Many good things happened to me internally that week. I had an increased desire to save the lost and lots of ideas on how to implement what I learned when I got home. I never knew my new found ability to carve a foam prop would benefit the ministry — but it has!
I know what you’re thinking. Doesn’t sound too important; however, making foam props and signs does more than make a crusade stage look impressive. It gives volunteers, including newly saved ones, an opportunity to show their artistic ability for God. Expressing personal worship through arts is a worthy lesson to learn and share.
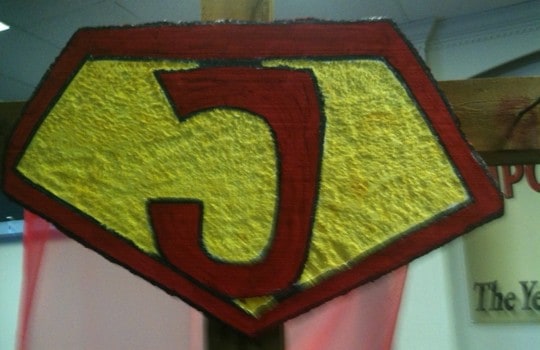
This year, when I chose our theme for kids’ crusade, I knew I needed some foam to pull off the prop I had planned. The goal was to decorate a giant wooden cross (we have had forever) with a long, flowing red cape and foam “Super J.” Here’s how we did it.
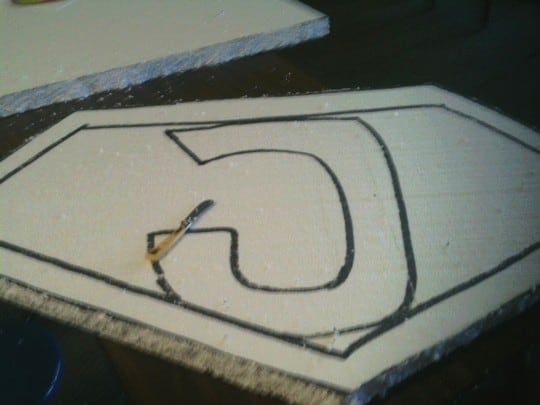
I purchased a 6-foot long, 3-inch wide foam sheet from the home improvement store. I made a transparency intending to project it on the sheet but discovered the projector wasn’t working. An artistic volunteer and I decided to sketch the design on the foam using a pencil. Next, we outlined the pencil drawing with a permanent black marker.

We used two metal spoons, like coffee spoons, to dig out the foam around the super J. Digging down a little gave the sign a cool, 3-D effect. When painted and finished, it would look like stone.
Next we used a ShopVac to suck away the excess foam pieces. This gave the sign a clean surface to paint.
I chose red and yellow craft paint to make the super sign. I poured the paint in foam cups and added some water to make it thinner. With a sponge applicator, I dabbed on the color, working the yellow paint into the faux stone area first. You have to move the sponge around to get all the foam surface covered. After that dried, I used red paint to color in the letter. I let the paint dry completely then drew on the lines again using the permanent marker.
We stapled the fabric to the back of the cross then positioned a small fan to make the cape blow in the breeze.
I tapped two nails into the front of the cross and pushed the foam piece onto it carefully. The finished product look terrific! This fun ministry is great for volunteers who want to help but don’t like being too visible. Get creative and make any sign you like using foam and few cheap tools.
How to Carve a Foam Superhero Emblem
New Sunday School Curriculum: Our Bible lessons are designed to keep the kids’ attention and show how God's Word makes a difference. Every series is flexible enough for a wide-age group and affordable enough for small churches. Download a free Bible lesson in pdf or view our latest Sunday School curriculum for small churches.
